e-access Tools and Resources
e-access is an online administration tool for OMERS employers. Use it to look up member information, send and receive e-Correspondence online through a secure web channel and check the status of an event or process an e-Form.
How to register for e-access
OMERS e-access is for employer use only. To register for e-access or if you need to register additional users, complete the e-access registration form available (form 109) on the Employer Forms page.
Data extracts
This e-access feature enables you to download membership information directly from e-access. You’ll find this useful in many ways, including cross-referencing OMERS data against your payroll records. This is especially useful when it comes to preparing your members’ T4 income tax slips.
Request a data extract
From the e-access homepage:
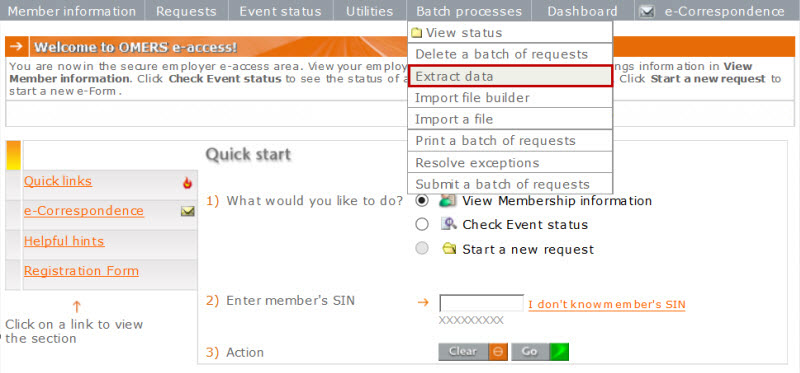
Open the Batch processes drop-down menu.
Click Extract data.
From the Extract member information page:
Open the drop-down menu next to Please select extract type -> and select the type of extract that you would like.

Open the drop-down menu to select the Year of the member information you want to extract.

Click Submit. A legal Disclaimer appears.
When you have finished reading the disclaimer, click I agree to continue.

From the View status page:
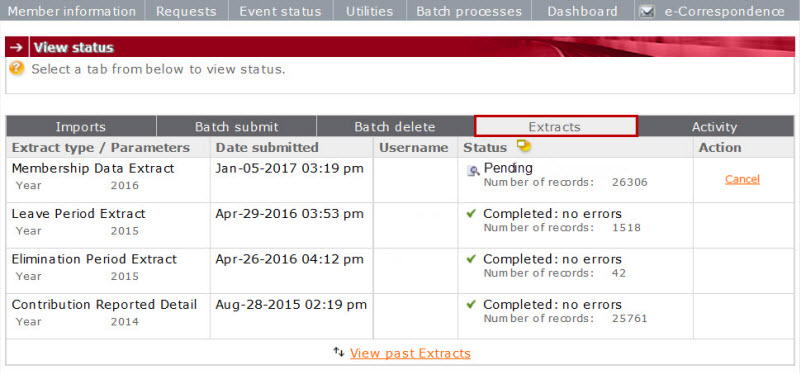
Click the Extracts tab to see information about the extract, including the date it was submitted, the username of the individual who requested it, and the status of the request
Tips:
Click the icon next to Status to see an explanation of each status.
While the data extract is Pending you can Cancel it.
Notes:
You’ll notice there is a link to View Past Extracts, if you want to refer to or download an extract you requested within the last seven days.
While your data extract is being processed, you can continue to process other requests.
Download a data extract
Once your data extract is complete, you’ll notice the Cancel link next to it changes to Download. You can now download the data extract – as a Text file (.txt) – to your computer.
Click Download. The File Download box appears.
Click Save. The Save As dialog box appears.
Note: Your data extract is given a default file name, which you can change at this point – to make it easier to find later on. Also, you can choose in which directory you wish to save the file.
• Click Save.
• Once the Download complete dialog box appears, click Close.
View a data extract (in Excel)
Now that your data extract file has been downloaded, you are able to manipulate the data to suit your purposes.
If you’d prefer to convert the file into Excel format…
Launch Microsoft Excel.
From within Microsoft Excel 2003, click File -> Open from the Excel menu bar. The Open dialog box appears.
From within Microsoft Excel 2007, click on the Windows icon in the top left-hand corner of Excel, click Open. The Open dialog box appears.
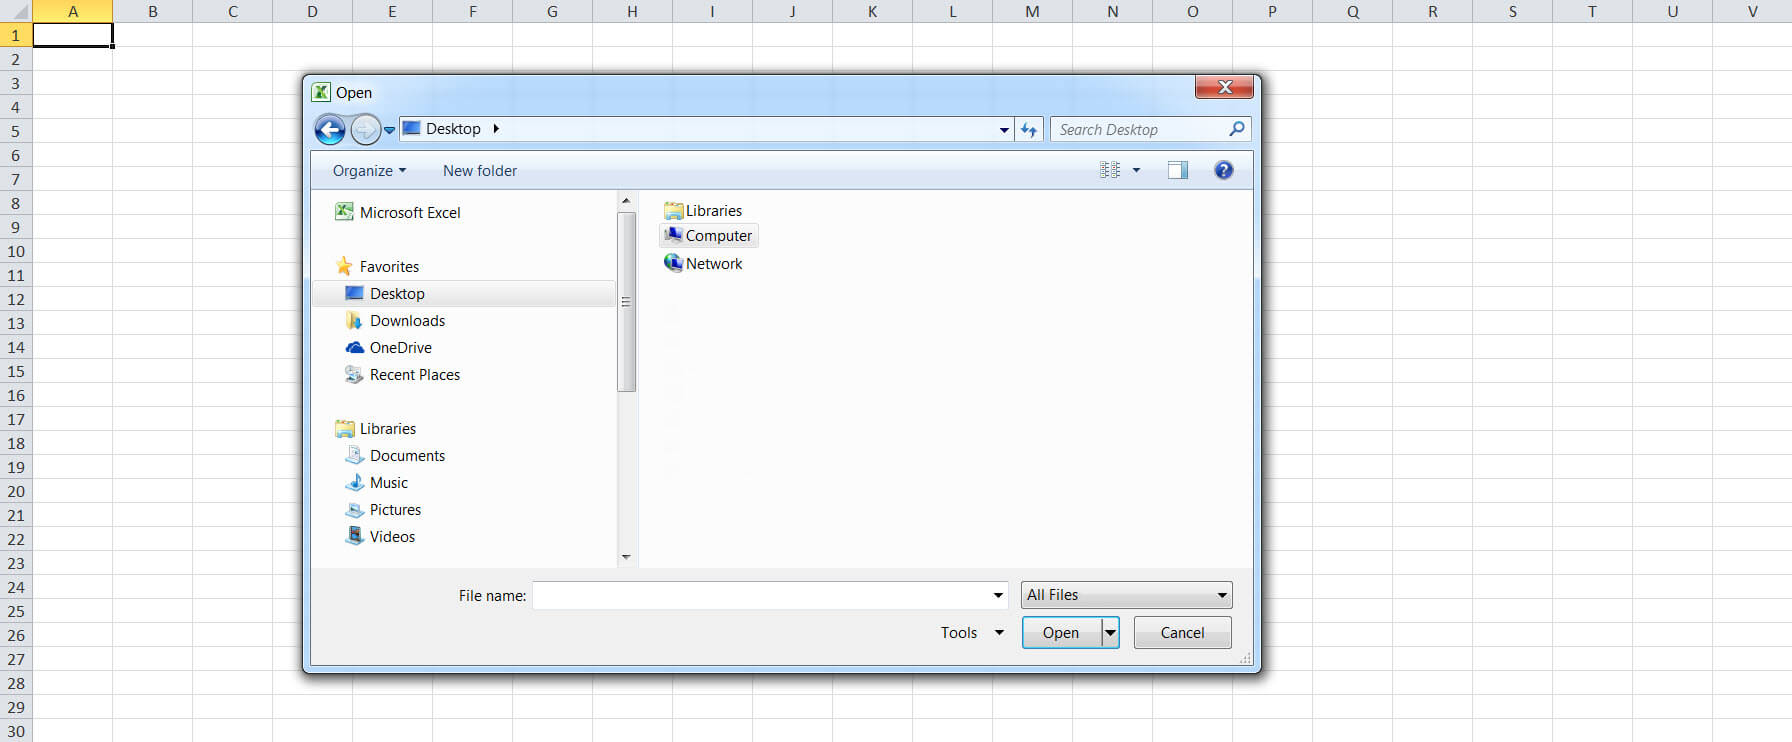
Navigate to the location of the file you saved onto your computer, select the file, and then click Open. The Text Import Wizard launches.
Important: In the Files of type drop-down menu, select All Files (*.*). This ensures your data extract file will be listed in the folder in which you saved it.
Do the following to set up the presentation of your extracted data…
Text Import Wizard – Step 1 of 3

Click the Delimited button.
Click Next.
Text Import Wizard – Step 2 of 3
Excel 2007

Select the Tab and Comma options.
Click Next.
Text Import Wizard – Step 3 of 3
Review the date in the Data preview pane.
Click Finish. The extracted data is presented in an Excel spreadsheet.
Save a data extract
To save your data extract file as an Excel spreadsheet…
From within Microsoft Excel 2003, click File -> Save As from the Excel menu bar. The Save As dialog box appears.
From within Microsoft Excel 2007, click on the Windows icon in the top left-hand corner of Excel, click Save As. The Save As dialog box opens.
Important: During the save process, make sure the file type is an Excel file (.xls) and not a Text file (.txt). This ensures that your data extract file is saved in an Excel-format table, which is easy to use for manipulating data.
Note: Your data extract is given a default file name, which you can change at this point – to make it easier to find later on. Also, you can choose in which directory you wish to save the file
Click Save.
Using a data extract
Now that you have the member information you requested in an Excel file on your computer, you can use this information as you require. For example:
Membership Data Extract – you can compare the details of this report against your payroll records to identify any members that are not enrolled or that should be terminated.
Important: If you report your e-Form 119 – Annual Reporting of membership information data before the end of February, you can then request a membership data extract and it will include pension adjustments (PAs) for your members.
Leave Period Extract – you can compare the details of this report against your payroll records to identify any leave periods that have not yet been reported or that have been incorrectly reported.
Contribution Reported Detail – you can compare the details of this report against your payroll records once all of your e-Form 119 Annual Reporting of Membership Information requests have been reported, to identify any discrepancies.
Elimination Period Extract – you can compare the details of this report against your payroll records to identify any elimination periods that have not yet been reported or that have been incorrectly reported.
Supplemental Plan Class Definition Extract – you can use this data to define memberships for inclusion in a Supplemental Plan Class to be used in the Supplemental Cost Estimate request.
Types of data extracts…
Membership Data Extract
Leave Period Extract
Contribution Reported Detail
Elimination Period Extract
Supplemental Plan Class Definition Extract
e-Correspondence
This e-access feature lets you send and receive e-Form correspondence through a secure web channel. Use it to ask a question about any e-Form, or to provide follow-up information requested by OMERS.
What you send through e-Correspondence
• May be specific to an e-access form.
• May be specific to a member.
• Is secure, for sending a member’s personal/financial information.
• Can be viewed by any of your e-access users – so you don’t have to worry about being away from the office.
When you should use e-Correspondence
• To ask for assistance interpreting an error or warning that is preventing you from submitting an e-Form.
• To provide additional information in response to a follow-up question from OMERS.
• To request corrections to member records that you can’t send through an e-Form.
• To advise of retro pay for terminated or retired members
When you shouldn’t use e-Correspondence
• For general administration or business questions. Continue to send these to us using employer@omers.com.
• For an e-access password reset or to discuss any technical issue you are having with e-access, call OMERS Employer Services.
Note: e-Correspondence replaces mail, email or phone follow-ups, which greatly speeds up the processing of your e-Form requests. You can communicate directly – back and forth – with OMERS until a particular issue is resolved.
Accessing e-Correspondence
There are four ways you can access e-Correspondence:
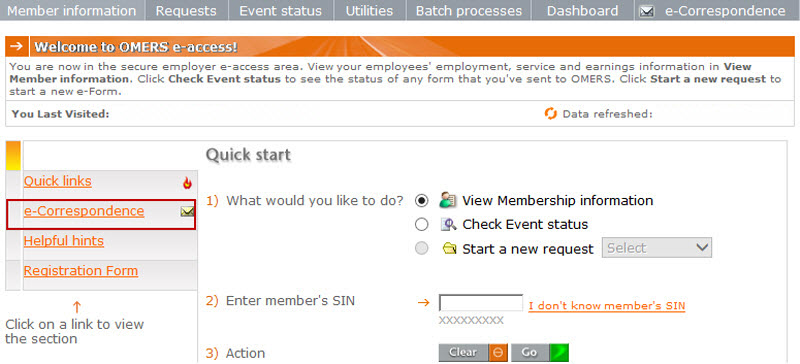
1. From the e-access homepage
Click the e-Correspondence link in the left-hand menu. This will take you to an e-Correspondence landing page that lists all your unread e-Correspondence for all e-access forms.
2. From the e-access top menu
Click the e-Correspondence tab.
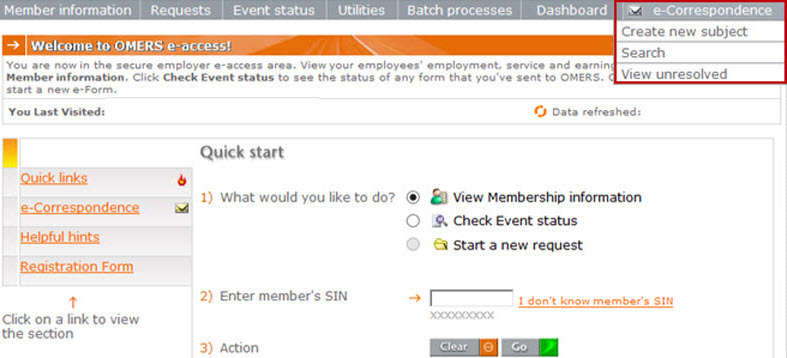
Selecting View unresolved takes you to the landing page that lists all your unresolved e-Correspondence.
From here, there are a number of things you can do, including creating, reading and searching for messages.
3. From your Dashboard landing page
Here, you’ll find a list of all your unread e-Correspondence related to the e-Form 119.

4. From within any e-Form request
When you’re viewing a request, click Create e-Correspondence to initiate a new subject and send a message to OMERS.

Using e-Correspondence
From the e-Correspondence tab on the e-access top menu, there are a number of things you can do, including creating, reading and searching for messages.

To create a new message:
• Click Create new subject. The new message screen appears.

• Select your Contact from the drop-down menu.
• Select your Category from the drop-down menu.
• Enter your Subject.
• Look up a member – this helps to specify which member your message refers to and forms part of their permanent record.
• Enter the details of your Message – be specific to reduce follow-ups.
• When you’re done, select Post message to send the message to OMERS. A screen advising you that the message has been posted appears to confirm your message was sent successfully.
To view unresolved messages:
Click View unresolved to see all of your unresolved messages, including those that OMERS has sent to you.
Your e-Correspondence appears in “pages”. A page displays up to 200 messages and can extend beyond your viewing screen. Simply scroll down to see the rest. If you have more than 200 messages, there will be more than one page to view.

To read a message…
Click on its link in the Subject column to open the message.

After reading it, you can continue the subject by posting a reply to provide us with additional information or ask another related question.

Note: e-Correspondence is a two-way communication medium. Please check e-correspondence frequently – in case we’ve sent you a message or a response to your message.
To close a subject:
Once you have all the information you need from us or we’ve notified you that an issue has been addressed, you can close the subject by clicking Resolve and exit within the message. This lets us know that the issue has now been closed.

Note: If OMERS initiated the subject, then only OMERS will be able to resolve the subject
To search for a subject:
To easily find the types of e-Correspondence you want listed, click Search to specify your search criteria. You can search by: status, category, contact, and/or date posted. You can also search for all subjects related to a specific member using Search for one member.
When you’ve selected your search criteria and clicked Search, all messages that match your criteria will be listed.
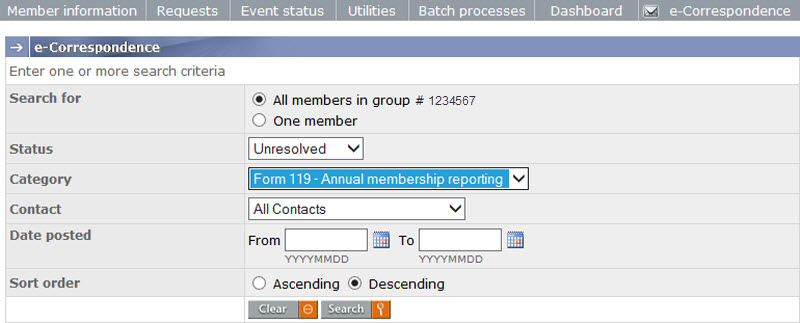
e-Correspondence categories
You can easily see the status of a subject by viewing status column to the left of the subject. There is also a legend indicating what each icon means.
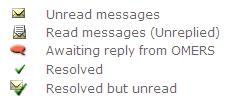
Unread messages – messages sent to you by OMERS
Read messages (unreplied) – messages sent to you by OMERS that you have not yet replied to or resolved
Awaiting reply from OMERS – messages that you have sent to OMERS but have not yet received a reply
Resolved – messages that have been addressed and are now closed
Resolved but unread – messages resolved by OMERS that you have not read
Quick tips
• Frequently log in to check for new messages.
• Communicate clearly, providing full details.
• Send a separate message for each member and each issue.
• Resolve and exit.
Questions?
We’re here to help. Please contact OMERS Employer Services.
File Importing and Batch Processing
These e-access features let you import member information directly into e-access and submit requests in batches – which is faster, more efficient and saves you time. You can also track processes you have underway.
Importing, batch processing, and status tracking features are available for e-Form 165a – Leave Period Reporting, e-Form 119 – Annual Reporting of Membership Information, and e-Form 106 – Changing Member Information.
Importing and batch processing use similar screens and navigation aids, and there are help and validation screens to guide you through the process.
Overview
The file importing and batch processing features of e-access will help you streamline leave period reporting. You’ll find greater detail about these steps in this information sheet.
Import a File
When you’re ready to transfer your e-form 165a, e-Form 106 or e-form 119 data into e-access, you have two options:
Create (“build”) a member data import file from Excel using the Import file builder.\
Use your own Text file (.txt) – you can import one or more member data files that have already been set up by your information technology staff (the import file specifications can be found in e-access help).
Using the Import file builder
From the e-access homepage
Open the Batch processes drop-down menu.
Click Import file builder. The import file builder page appears.
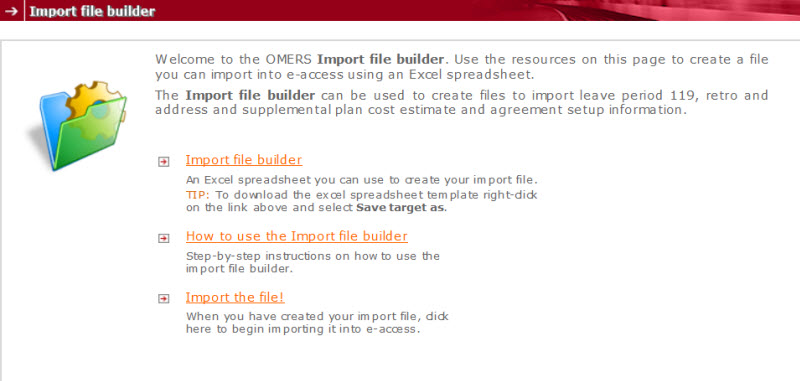
Click How to use the Import file builder for instructions, or go straight to the builder itself.
Right click Import file builder and select Save target as. (This saves the Import file builder to your computer, so you can work with it outside e-access, which we recommend.)
In the Import file builder Excel spreadsheet
Click on the tab (at the bottom of the spreadsheet) that represents the type of file you will be importing.
Enter or copy your member data into the builder’s spreadsheet.
Click Build import file. This prompts you to save the import (.txt format) file that you’ve just created.
Tips:
Mandatory fields in the Import file builder are in boldface.
Record where your import file is saved, so that you can easily find it again when you’re ready to import it.
Using the Import file builder
There are two ways to import your member data into e-access:
In the import file builder page…when you’re finished building your import file, you can click Import the file!
In the e-access Batch processes drop-down menu…click Import a file.
On the Import a file page
Select a Contact. This will be the person listed as your contact on requests created from your import file.
Click Next.
Open the File drop-down menu and select the type of file you’re importing.
Select the Reconciliation year, if applicable.
Click Browse to find and select your previously saved import file.
Click Import file.
Important:
Do not exit e-access until the import-file transfer to OMERS is complete. (This will normally take no more than a couple of minutes.)
When the file is transferred it will be Pending – in queue, waiting to be processed. Then it will be listed as Processing while e-access does some basic checks to ensure the information is in the correct format for the type of import you have initiated. You can check the status of your import file by opening the Batch processes drop-down menu and clicking View status. Once the file has finished processing, it will be listed as one of the following statuses: Completed no errors, Completed with errors, Failed.
If the import was successful, and…
There were no errors – the information in the import file is stored in e-access as requests, which are ready to be process whenever you want.
There were errors – for example, you import a file with 2,000 records, and 1,990 are correct but 10 have errors – you must first click the Review errors link (in View Status Imports), review them, and then acknowledge your review by clicking the Review completed button. Then, your successfully imported requests (all 1,990) are made available for processing.

Important:
Once you review errors, click Review completed.
Requests can’t be created in e-access for records with import errors. You have two options:
Manually create requests for the records that generated errors.
Create a new import file with just the (corrected) records that generated the errors.
If the import file failed
You’ll have to review the error log, and then correct and re-import the file.Note:
You can only import one type of file at a time. You must wait until any previous import files have finished processing, and you’ve reviewed (and acknowledged) their error logs, before you can begin another import.
Batch processes
Batch processing e-Form 165a, e-Form 119, and e-Form 106 transactions gives you the option of submitting more than one member’s request at a time. It also enables you to print election forms or delete requests in batches.Note: Large batches of requests will be processed overnight (after 6:00 p.m.). Until processing begins, they will be listed as Pending. Please see the section of this information sheet on “View status”.
Submit a batch of requests
This feature enables you to validate and submit all requests you haven’t yet submitted (not just those you’ve imported).
In the Batch processes drop-down menu, click Submit a batch of requests > Request type. You’ll be shown how many requests you haven’t yet submitted, and that are ready to submit – from any current or previous imports as well as any individual requests you’ve manually entered.
Either click Submit ALL requests, or enter your search criteria to identify specific requests you want to submit.
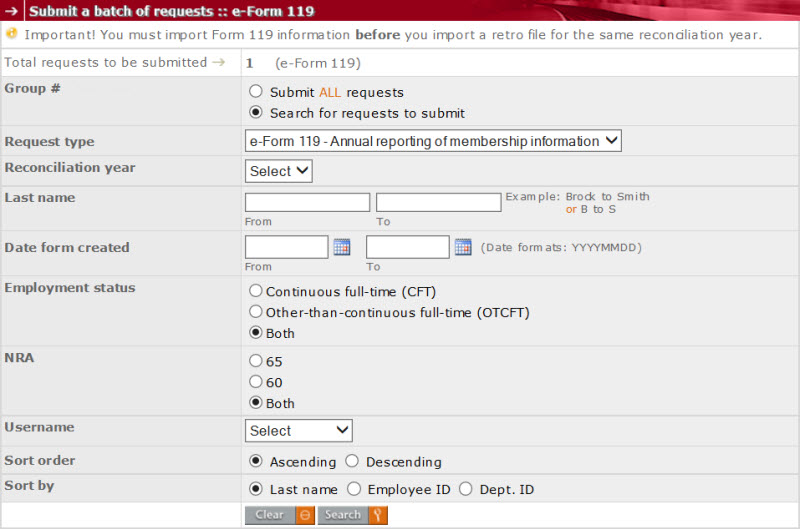

Click Submit. The requests are processed. Please see the section of this information sheet on “View status”.
View Status
This feature is extremely helpful…and necessary. It helps you keep track of everything you’ve imported, batch submitted, or batch deleted.
In the Batch processes drop-down menu, click View status.
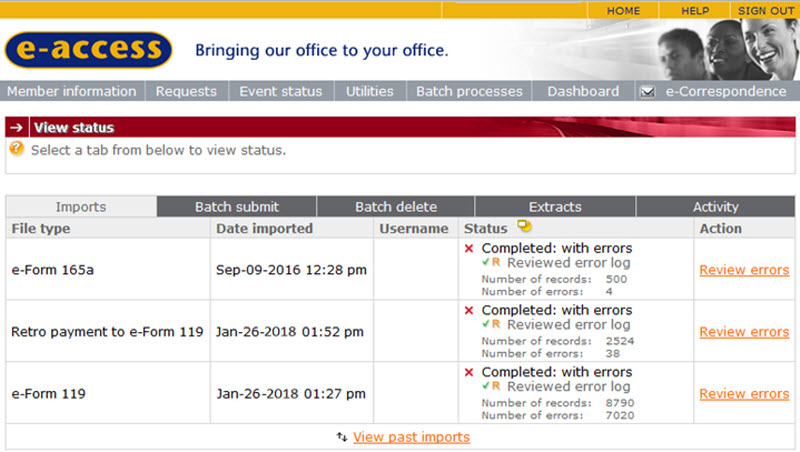
There are five tabs to click: Imports, Batch submit, Batch delete, Extracts and Activity.
Click the tab for the process that you want to monitor.
Imports – this tab will show you:
The file(s) you are currently importing (a bar graph tracks the progress) or have most recently imported,
Whether they were imported successfully, and whether there were any errors when they were imported.
Important: Here, you can (and must) review and acknowledge any import errors before your requests from the import file are made available for processing.
Batch submit – this tab shows you batches of requests you have submitted. You’ll be able to see what batches are Pending, Processing, and whether there were any exceptions with your requests.
Batch delete – this tab shows you the import files or batches of requests you asked to delete. From here, you can also cancel any deletions that haven’t yet started processing (status still Pending). Once processing starts, you can’t cancel them.
Extracts – this tab shows you the extracts you have requested. For more information, please see the information sheet on Data extracts.
Activity – this tab shows you activity type, date submitted, username and status.
Returned e-Form
If you submit an e-Form to OMERS that we cannot process because information is incomplete or incorrect, we will return it to you, along with an e-Correspondence describing the issue.
How e-Form returns work
You submit an e-Form to OMERS, but some information is missing or incorrect and we cannot process the e-Form without it.
We will return the e-Form to you, along with an e-Correspondence describing what is missing or incorrect. The returned e-Form will contain all the data that was in the e-Form that you originally submitted to us.
Returned e-Forms will show in the e-Correspondence subject field.
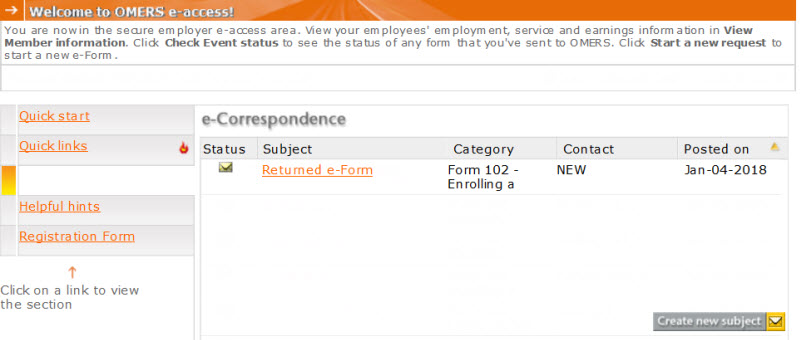
Returning the incomplete e-Form to you with an e-Correspondence lets us keep all your data in one place for easy reference. When the e-Form is resubmitted, a new summary document is produced with updated information; and the e-Correspondence is available to all e-access users in your group.
Note: Remember to check your e-Correspondence to view a Returned e-Form located under the Subject heading.
How to handle returned e-Forms
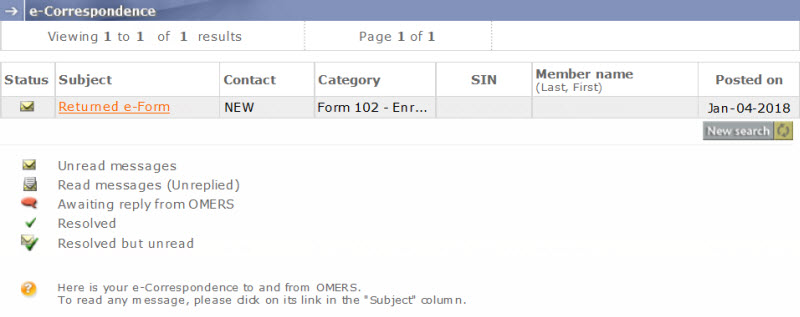
Read the attached e-Correspondence.
Retrieve the e-Form using the Request not yet submitted to OMERS search.
Make the necessary corrections and resubmit the e-Form to OMERS. OMERS will validate the information on the resubmitted e-Form, process the request, and resolve the e-Correspondence.
If we have further questions, we will contact you to resolve them.
e-Correspondence
Is a safe and secure communication channel within e-access.
Automatically creates an electronic “paper trail”; information is attached to the member’s record.
Can be viewed by any e-access user in your group; if the sender of the e-Form request is away, another e-access user can carry on with the process.


